Suspension:
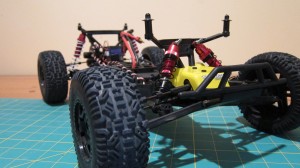
Let’s start with the suspension. First off get aluminum pivot blocks. They’re a problem on the Kyosho and that problem is only magnified with the parts quality of the Turnigy. Next is the shocks. The shocks must be modified so that the chassis bottoms out otherwise all the force created by the weight of the buggy is concentrated on the middle of the suspension arms at the point in which the shock bottoms out. This causes breakages which, again, are magnified by parts quality. By using Traxxas Slash shocks, I’ve actually gotten away with the stock arms so far thanks to this mod but I still have Kyosho parts in waiting. HPI shocks have also been proven to work well. I did replace the pivot blocks with aluminum since they are prone to breaking.
I used spacer that came in Drive Hex Part #KYOUM603
Along with more spring options these shock offer better dampening than the stock shocks due to the larger diameter of the shocks. Because this is a 2wd truck, I don’t see any good reason to use any big bore shocks. Yes, I said truck.
SC Mod:
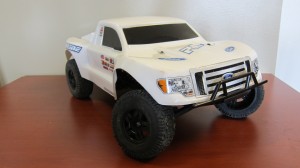
The idea behind this was simple. If the Kyosho Desert Buggy is based on the Ultima SC, and the Turnigy Desert Buggy is a clone of the Kyosho, then I should be able to convert the Turnigy into a cheap short course truck. The conversion was just as easy in practice as it sounds. Install the Kyosho Body Mount Set KYOUM604 and you’re ready to go. You’ll also need to get a total of 4 extra button head screws M3x8 and 2 M318. The side bumpers will also need to be modified to fit properly. You may also want the Kyosho Ultima SC Bumper Skid Plate and Support Set KYOUM602 to complete the look. For racing I would recommend AKA Racing Mounted Enduro Short Course Tires AKA13002SRA. The SC body is a Ford F250 body from Proline. The SC designs allows more shock from crashes to be absorbed by the body which only increases durability.
You need the M3x20 screws because the stock screws aren’t long enough with the added body mount.
SC Bumper Install:
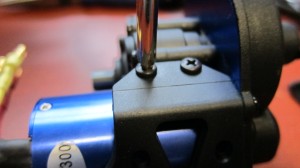
Start by removing the 4 screws from the bottom of the chassis and these two screws.
This will separate the Drive train from the vehicle. You will also need to remove the two turn buckles.
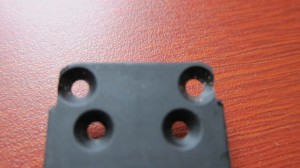
Take this time to install your aluminum pivot blocks if you have them. The only mod you will have to do to install the pivot blocks is trim down the bottom plate like so.
I suggest using the screws provided in the kit for the RR (rear, rear) pivot block, but use the stock screws for the FR (front, rear) block since they are longer and not self taping.
You will need to completely disassemble the botom plate and motor guard so that you can remove the motor guard and replace it with the rear bumper piece.
Completion of the rear bumper is vey simple from here. You may need a few extra screws to complete the installation. I had some left over from my Mad Force build that I used. You should only need about 4.
Now onto the fron bumper. Start by removing the stock front bumper. Remove this odd little piece and place it on the new bumper like so.
The rest of the installation is exactly like the stock front bumper, just bigger.
I’m thinking about a few more mods but she is pretty much done.
Update!
Hobbyking is now selling the desert buggy from the USA Warehouse! They are also selling a lot of aluminum upgrades with reasonable prices.


hi what screws do you need to install the new parts for the conversion? also what part number are those shocks?
I was able to do the entire conversion with screws from the Turnigy buggy and ones that came with the parts if I remember correctly. If you wan’t to play it safe I would grab a few 3×6 screws. The shocks are Traxxas shocks with STRC aluminum bodies and aluminum caps.
STRC Aluminum Bodies #ST2267R and ST3766XR
STRC Aluminum Caps #ST2267R
STRC also has non-threaded shock bodies which can be had for a little less if you wish to save some money. I would start out with stock Traxxas Slash shocks and upgrade them on a needs basis. The aluminum caps are very popular and the only upgrade you will probably need. If you have any more questions please let me know.
Thanks for the reply. How is she holding up? also do the nerf bars come with the bumper kit?
No problem. The truck is holding up well but i seem to be going through a decent amount of spur gears. The nerf bars come with the body mount set #KYOUM604. I would also pick up an extra set of dob-bones as they tend to bend.
Interestingly done. I’ll get a SCT body to give it a try. Already got the KYOUM602 and KYOUM604 over the weekend.
Also, I’ve drilled 2x 1/16″ holes in the shock piston, but its still too darn lazy. Will proceed to change shock oil to 30wt as many recommended. Other than that, my slipper clutch nut worked itself lose (small fix)
I tried working with the stock shocks and just wasn’t happy. A few people have made them work but i found them to be nothing but trouble. When you done with your conversion post a link to some pictures!
haha. i’ve got a set of aluminum adjustable shocks cheap. will replace the shock oil with 30wt. the stock shock oil smells like motor oil
Ah, I’ve heard of people getting cheap shocks with what smells like motor oil in them before. Anyways I hope they work out for you. Certainly cheaper than my Traxxas parts.
Here’s my SC body i got last week! Will get some paint later 😀 http://i66.photobucket.com/albums/h280/ericmaxman/rc/IMG_20120803_222009.jpg
Looks Great!!
SCT conversion completed! Well, sort of. I’m waiting for HK to stock up on the rear 2WD Turnigy SCT bumpers.
Do I need any additional parts to install Traxxas shocks on the DB? I know the stock shocks use little ball/knuckle connections on the lower mounts.
Yes, this hardware kit should include most everything. You may need a couple spacers as well to make sure everything fits without rubbing
http://prolineracing.com/performance-parts/powerstroke-sc-universal-shock-mounting-hardware-kit/
I really like this Turnigy DB buggy, I have broken the front a arm mount and modified a Blitz aluminum one, stripped the spur and replaced it as well, and did break the rear toe blocks….so aluminum ones are going in….. put the correct bearings in the wheels and seemed to take away alot of play, I did some trimming on the body to make it easy to take off plus get to the on/off switch…..I put better tires and wheels on, have to change out the shock to aluminum bodied ones….but other wise its not a bad buggy for the price….Im gonna get this thing all fixed up!! It can be a formidable buggy just need to work out the bugs……rock onn guys/gals!!
Hey there..
im a turnigy 2wd buggy owner and fan 🙂 i follow ur guide and i buy some day ago some spares and hop up…
i have some question..
how long in ur upgraded shocks? For setup you make them more stiff or soft?
any more upgrade for improve durability
@Ron Hull
What kind of modification u do? You have some photo and info about?
Thanks and good 2wd bashing
The shocks are stock Traxxas Stampede Rears. Not sure of the length off the top of my head but a google search should find it pretty quick. Track conditions dictate your suspension settings but I would go towards the softer side. The only other thing I could suggest is to boil you plastic suspension parts. This softens the plastic up a little to give it some more flexibility.
Hey Super….I built my own rear toe block out of a 1/4 square stock…just cut it and drilled to get it too work. I also modified an aluminum Blitz front a arm mount cause I broke that on the stock buggy. I also modified Duratrax Evader A arms to fit, so that way if I break another a arm…I can pull one off my shelf…same with the steering blocks and c hubs. I used traxxas long shocks in the front and Traxxas extra long in the rear…just used the stock traxxas shock mounting hardware….I also installed hinge pins that I had in my spare parts bin. I put better bearings in and ones that really fit the hubs and such. I plan on modifing the rear Evader metal chassis brace to fit the chassis so that way the rears will be parts off my shelf along with the CVD’s that come on Evaders too. Im running into problems with the diff and I have read somewheres that ya need to shim the diff…still waiting for the respnse for that problem….as far as pics…I cant figure out where to post em…Im on facebook..Ronnie Hull and I have pics in my mobil uploads albums…..unless I can figure where to post my pics
I notice in the photo that you are using a large Philips head screw driver, that will strip Phillips heads. That’s why there are different size Phillips head tips. That one is too big. A medium size should bill the entire cross